
System Administration
Roles
You can mimic your organization-wide hierarchy in PE Front Office with the help of Roles. You can assign identical designations to your employees like Sales Manager, Support Engineer, etc. User's position in hierarchy will decide which of the records he/she can access.
Notes: When
Sharing Rules are set to Private, users can always view their own records and
their subordinates' records, whereas non-admin users can not view records of
their superiors and peers
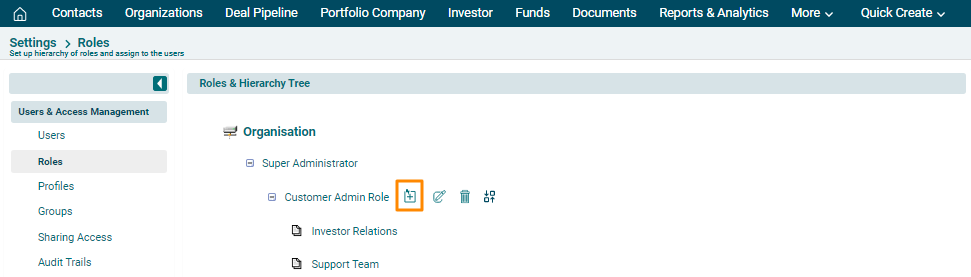
Add A Role
This feature enables you to create new roles for your users to mimic your organization-wide hierarchy in PE Front Office. Roles like CEO and Sales Manager are provided by default along with PE Front Office package. You can now define access privileges while you create a role. The idea is to reduce clicks and navigation. Having privileges defined on a role eliminates the necessity to create a different profile and associate it to a role. Additionally, you need not have to visit individual profiles to view or modify privileges you've defined earlier.
To
add a role, follow the below steps:
1. Click on CRM
Settings icon ( ) in the top right corner of the panel.
2. In the Users
and Access Management panel, click on Roles.

3. The Roles & Hierarchy Tree is displayed. Navigate to Organization or Role and click on Add icon.
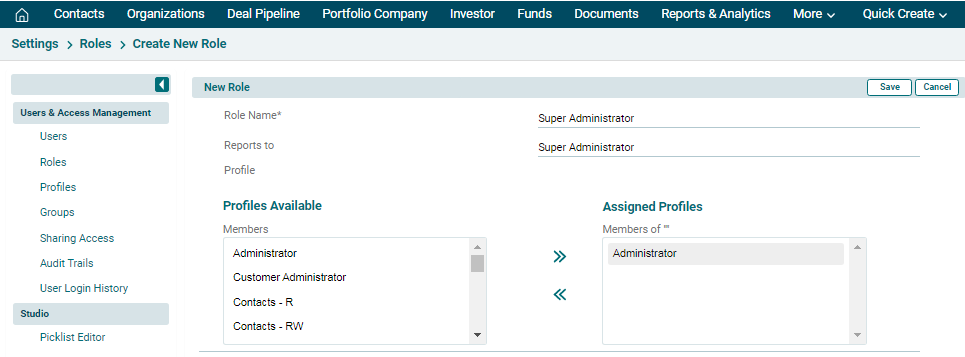
4. The New Role window is displayed. Specify the Role name, reporting details and assign a profile. Click Save.
5. The
role is assigned when a user is created. It is a mandatory requirement of
creating a user.
Edit
A Role
To edit
a role, follow the below steps:
1. Click on CRM
Settings icon ( ) in the top right corner of the panel.
2. In the Users
and Access Management panel, click on Roles.

3. The
Roles & Hierarchy Tree is displayed. Navigate to Organization or Role and
click on Edit ( ) icon.
4. Update the details and click Save.

Delete A Role
To delete
a role, follow the below steps:
1. Click on CRM
Settings icon ( ) in the top right corner of the panel.
2. In the Users
and Access Management panel, click on Roles.

3. The
Roles & Hierarchy Tree is displayed. Navigate to Organization or Role and
click on Delete ( ) icon.
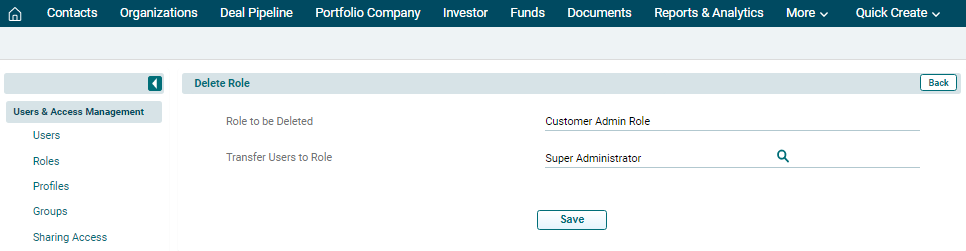
4. You will be prompted
to transfer the ownership to another user. Choose a role from the dropdown and
click Save.
Move Role
To
move a role, follow the below steps:
1. Navigate
to Organization or Role and click on Move Role ( ) icon.
2. Drop the role in the desired record.

Notes:
1. You
can associate multiple users and profiles for the same role.
2. When
you associate multiple users for same role, the users under the role will not
be able to see each others' records.
3. A role always work with respect to Profiles and Sharing Access.