Integration

Synchronize Calendar And Tasks

PE Front Office allows you to sync your calendar and tasks between Outlook and PE Front Office.

Enable Synchronization

To enable synchronization, follow the below steps:

1. Navigate to More in the main menu. In Plugin, click on Outlook.


2. The Outlook Synchronize window is displayed. Click on Synchronize Settings in the top right corner of the panel.


3. Click on Sign in with Outlook button to choose an email account. A new window is displayed. Choose your account.


4. Enter the following details:

  • Calendar Sync Direction: Choose the direction of calendar synchronization, i.e., Outlook to PE Front Office, PE Front Office to Outlook, or Both.
  • Enable Calendar Sync: Check the box to enable the sync.
  • Select Tasks Folder: Choose the folder for to do lists.
  • To Do Sync Direction: Choose the direction of task synchronization, i.e., Outlook to PE Front Office, PE Front Office to Outlook, or Both.
  • Enable To Do Sync: Check the box to enable the sync.
  • Enable One Drive: Check the box to enable One Drive.

5. It is recommended that the sync direction always remains PEFO to Outlook for Contact sync to avoid duplication of records. Click Save to enable sync settings.

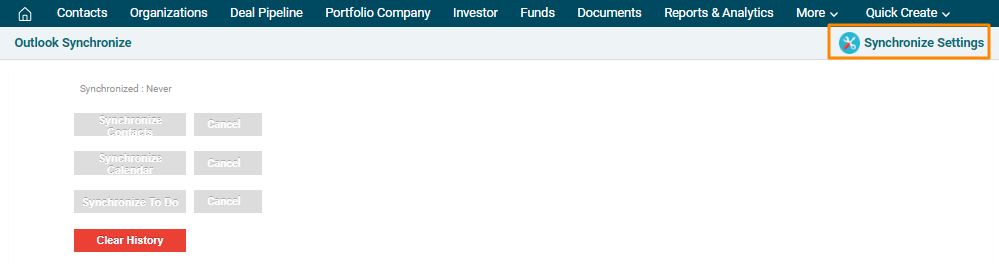
Synchronize Calendar And tasks

To synchronize calendar and tasks, follow the below steps:

1. Click on Clear History button to clear previous linkages

    2. Click on Synchronize Calendar and Synchronize To Do buttons to sync contacts.

    3. The synced records will appear. You can review the sync history along with date, Time, and module.

    Note: The records are synced in a group of 100. In case more than 100 records need to be synced, run sync multiple times.